Congratulations on your Public Radio Maker Kit!
This guide will help walk you through the steps necessary to turn your Maker Kit into a fully functioning, single-station radio. We'll cover three sections: electronics assembly, hardware assembly, and programming. There's also a small troubleshooting section if you get stuck at any point.
Tooling Up
To assemble your Public Radio you'll need a few tools. You don't need these exact models, but here's what we're using.
- Soldering Iron
- Tip Cleaner
- Solder
- Desoldering braid
- Needle nose pliers
- # 00 phillips screw driver
- 1/16" allen wrench
You'll also need an AVR programmer. There are several types of programmers out there, we've used these models successfully.
- AVR ISP Mkii
- Usb Tiny / Pocket Programmer NOTE - Make sure you do NOT have batteries installed in your Public Radio when using the USB Tiny, and set its switch to "Power target."
- UsbAsp Programmer NOTE - Make sure you do NOT have batteries installed in your Public Radio when using the UsbAsp. You'll additionally need a 10 pin to 6 pin adapter.
Lastly, you'll need two AA batteries, and a mason jar! We're using the half pint elite mason jar, but you can use any wide mouth mason jar you find
ELECTRONICS ASSEMBLY
Un-package the box, and pull out the printed circuit board, 4 battery clips and potentiometer.
Snap in the battery clips to the PCB from the bottom side. Make sure they are in the correct orientation, facing each other, like in the photo, so that they can hold a battery once soldered in place.
Flip over the PCB, and now you should have a pretty steady surface to solder the battery clips on. Break out that iron and solder those on.
Now take the potentiometer, drop it into the PCB, making sure that it's fully seated in place and solder it up. We find it easiest to 'tack' the pot in place from the topside, then flip it over to finish soldering from the pads on the bottom side.
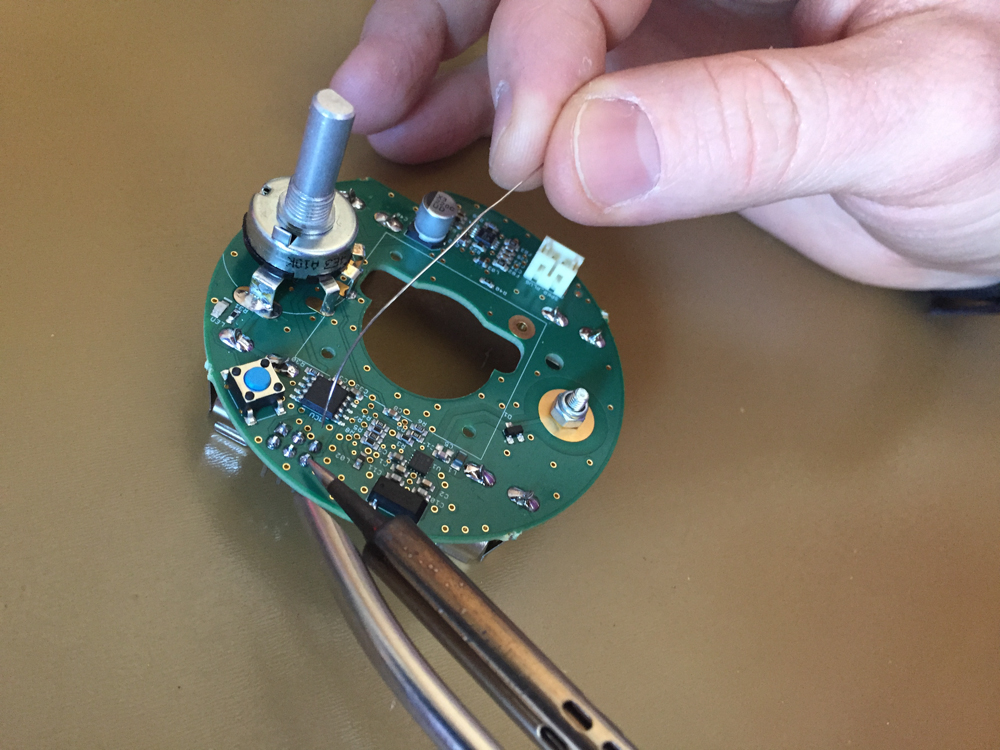
In the last soldering step we'll place the 6 pin header. It gets inserted from the bottom side with the longest leads pointing down.

HARDWARE ASSEMBLY
We start with your fully assembled PCB, a speaker, a spacer, a lid, some nuts & bolts, the knob & set screw, potentiometer washer & nut, batteries, jar, ring and antenna.
Install the antenna screw & nut and fully tighten.
Install the speaker on the PCB.
Then slide the spacer over the potentiometer and onto the speaker.
Now install the lid over the potentiometer as well.
Loosely install the potentiometer washer and nut. Then install the small screws through the lid, spacer, speaker and PCB and thread nuts on their ends.
Once all the screws are installed loosely, snug up the nuts and then the potentiometer washer and nut. Then install the knob, with it's set screw, making sure the set screw is facing the flat portion of the potentiometer shaft.
Now install the antenna through the lid and thread it onto the screw. Install the batteries, taking note of their orientation.
You're almost ready to put the radio in the jar, but first we need to tune it! Skip ahead to the software section and then you can drop it in the jar when you're finished.
SOFTWARE INSTALLATION
Public Radio Firmware
In order to flash the firmware onto your radio we've put together a simple program to make the process a bit easier. We've done our best to make it as cross platform as possible and include as many of the dependencies as we could. To begin you'll need to install AVRDUDE, a command line tool, which will work in tandem with your AVR programmer. Follow the instructions below, for Mac, Windows or Linux.
MAC
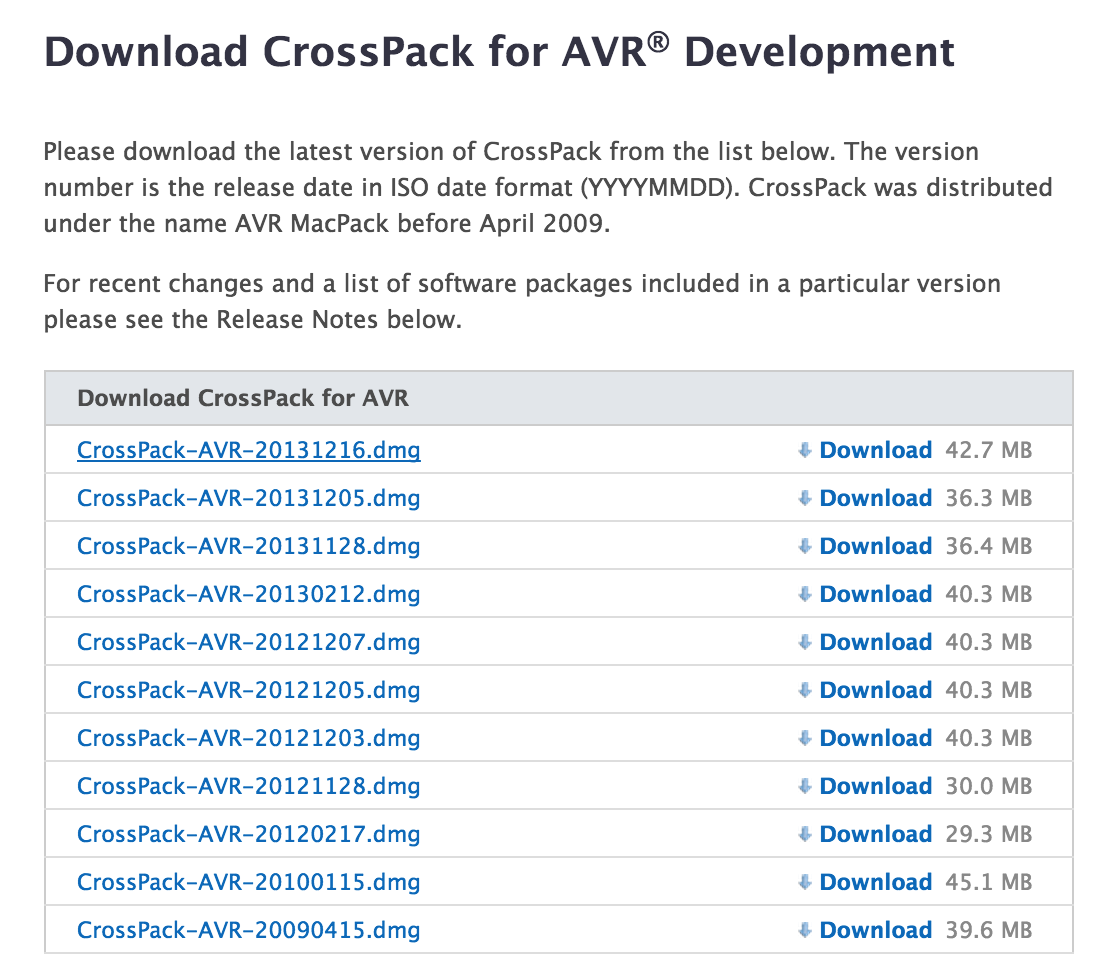
Install AVRDUDE by opening this link and clicking the download button for CrossPack. Download the most recent version - 20131216, and follow the prompts to install the program.
Download the Maker Kit for Mac application here. Unzip the folder, and double click the executable file, Maker. This will launch terminal and a small interface for you to enter your radio presets. Depending on your preferences for 3rd party developers, you might have to open by right clicking on the file and then command clicking to open.
Plug in your programmer to the USB port on your computer and attach the ribbon cable of your programmer to the radio's 6 pin header, making sure it's in the correct orientation. There should be an arrow on the ribbon cable to indicate Pin 1 that you can match with the white circle on the PCB.
Note: If you're using the USB Tiny or UsbAsp, you should NOT have batteries installed at this point! Don't install batteries until after the programming sequence is complete and you've unplugged the programmer from the PCB.
Fill in the fields for frequency and programmer in the Maker application and click "flash my radio". This should take a few seconds. *Note* programmer is the AVR programmer you are using. If you're unsure of this field, you can visit this link and scroll to the "programmer id" heading. You'll want to enter the programmer id in the left column that matches your programmer. If you're using a pocket programmer, you're all set since usbtiny is the application default.
WINDOWS
Install AVRDUDE by opening this link and clicking the download button for WinAVR. Download the most recent version - 200100110, and follow the necessary prompts to install the program.
If you're using a Sparkfun pocket programmer, follow along in this guide to install the necessary usb drivers. Otherwise download and install the necessary drivers for your avr programmer. Once successfully installed, return to the last step below.
Download the Maker Kit for Windows application here. Unzip the folder, and double click the executable file, Maker. This will launch a command prompt and a small interface for you to enter your radio presets.
Plug in your programmer to the USB port on your computer and attach the ribbon cable of your programmer to the radio's 6 pin header, making sure it's in the correct orientation.
Note: If you're using the USB Tiny or UsbAsp, you should NOT have batteries installed at this point! Don't install batteries until after the programming sequence is complete and you've unplugged the programmer from the PCB.
Fill in the fields for frequency and programmer in the Maker application and click "flash my radio". This should take a few seconds. *Note* programmer is the AVR programmer you are using. If you're unsure of this field, you can visit this link and scroll to the "programmer id" heading. You'll want to enter the programmer id in the left column that matches your programmer. If you're using a pocket programmer, you're all set since usbtiny is the application default.
LINUX
If you're running a flavour of Linux, you're probably already familiar with using the Terminal. If not, you can find the Terminal application already installed on all Linux distros. Fire it up!
- Install python-tk by running: sudo apt-get install python-tk
- Next, we need to install avrdude, if you don't already have it. The following commands will install the latest verison for you: sudo add-apt-repository ppa:pmjdebruijn/avrdude-release
sudo apt-get update
sudo apt-get install avrdude - Download our Public Radio Maker Kit app for Linux.
- You'll need to run our app with admin privileges. The most straightforward way of doing this is to use Terminal to cd to the directory where the app is, and run sudo Maker
- Attach your AVR Programmer to your usb port and the radio's programming headers at the other end. Note the orientation, and make sure the white dot indicating pin 1 on the PCB lines up with the ribbon cable's pin 1 indicator. Also note that if you're using the USB Tiny or UsbAsp, you should NOT have batteries installed at this point! Don't install batteries until after the programming sequence is complete and you've unplugged the programmer from the PCB.
- Fill in the correct fields for your frequency, deemphasis and programmer and click 'flash my radio.'
TROUBLESHOOTING
I can't solder the header in place, it keeps falling out!
- Try seating the header in the ribbon cable of your programmer, then mounting it on the PCB. You should have a slightly easier time holding the iron, solder and header at the same time. Otherwise, ask a friend to hold the header in place with the ribbon cable while you solder.
I'm seeing the error AVRDUDE: error: could not find USB device [...]
- Check that your programmer is plugged in correctly at both ends, and that the ISP header is not plugged into the Radio board backwards. Most programmers will have a red light if it's backwards, and a green light if it's correct.
- Ensure that you typed in the correct programmer codename in the second text box within the Public Radio app.
- Make sure your radio is turned on.
I'm seeing the error AVRDUDE: error: ser_open(): can't open device "USB": File not found
- Is your radio turned on? If not, switch it on and try again.
- You may see this on Windows if the driver for your programmer is not correctly installed/being found. Try reinstalling the driver, or try again after locating an alternate driver source.
I'm seeing a long, long error about Operation not permitted, help!
- My hunch is that you're running this on Linux, and the software does not have the right privileges to communicate over USB with the programmer. Try running the app prefixed with the sudo command.
- As always, make sure your radio is turned on.
I'm seeing the error "avrdude: warning: cannot get sck period. please check for usbasp firmware update
- This programmer most likely has out of data firmware, but your radio probably flashed and tuned just fine. To update the firmware you'll need a secondary programmer, so don't worry about it : ).